2019 Best Solutions to Fix SSD Not Showing Up on Windows
SSD drive is the best choice to enhance the performance of your device. Moreover, it increases the read-write speed as well as helpful for low power consumption. Besides its extensive features and incredible performances, some of the internal technical glitches make it critical for Windows users. Therefore, you might get stuck with the Windows File Explorer error and it shows the unexpected error message saying SSD not showing up in Windows 10.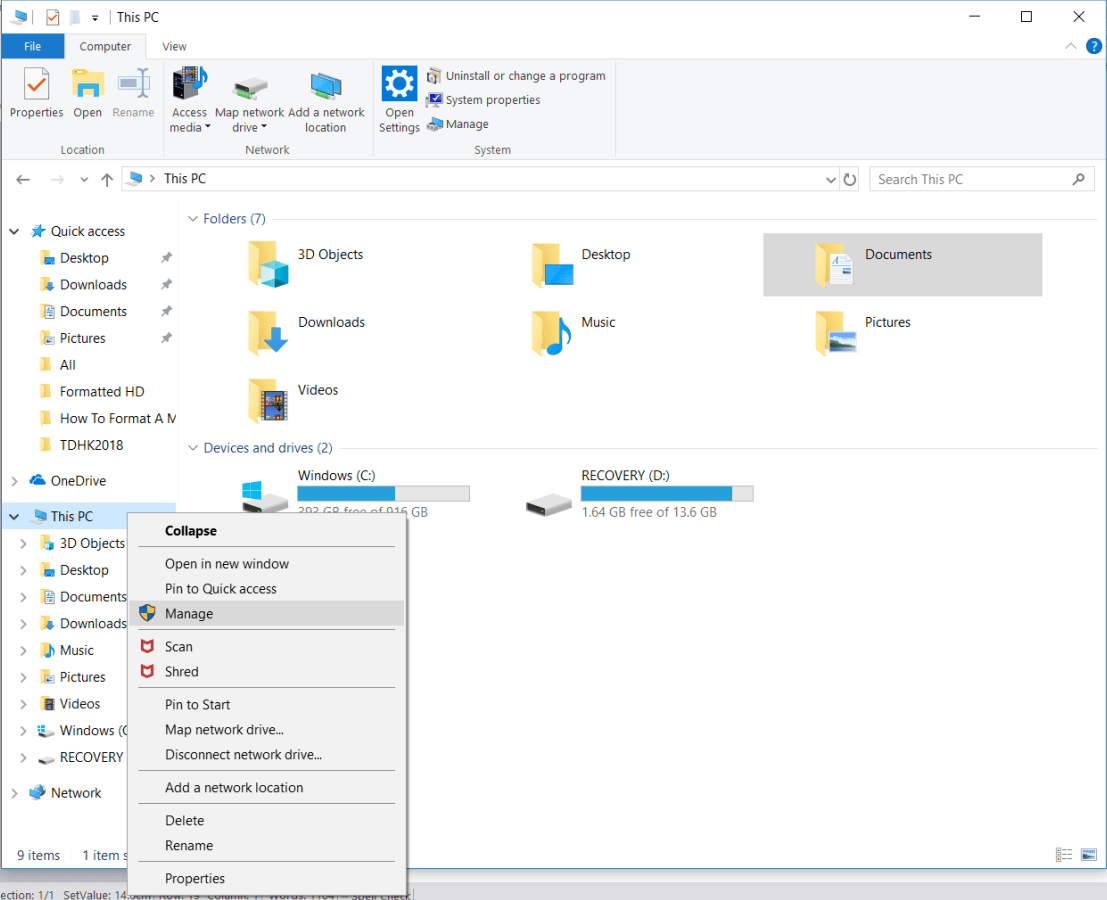
Sometimes, it appears in different formats, such as “SSD not showing up in File Explorer”, “SSD drive not showing up”, etc. However, we are going to discuss the effective solutions in this article that is suitable for resolving this technical hassle quickly and permanently.
Table of Contents
Significant Issues for SSD not Showing up in File Explorer
Some of the severe issues are responsible for creating this critical issue. Moreover, it affects the entire disk sector in Windows 10 and corrupts the system files also.
- If the SSD partitions are lost or it is kept as hidden format, then it becomes the problem in showing the SSD window.
- Sometimes, missing the drive letter of the SSD causes the “SSD not showing up” problem.
- SSD Driver issue is another major reason for making this annoying issue.
- If you forget to initiate the new SSD, then you can see this kind of error on the screen.
- Virus-infected SSD sometimes fails to show the SSD window on the screen.
- Outdated SATA storage controller is another barrier for opening the SSD window.
Fix SSD not Showing up in Windows with Easy Technical Ways
There are several ways to fix Windows SSD not showing up immediately. We are going to discuss them briefly those technical ways that help you to tackle this problem without any hassle. So, you might try out the following methods to overcome this severe issue efficiently.
Initialize SSD and Format Properly
- First, press the Windows key from keyboard and open the Start menu.
- Now, type “diskmgmt.msc” in the Cortana search box and hit the Enter key to launch the Disk management window. In the case of the Windows 7 or older version of the Windows, press the Windows + R from the keyboard to launch the Run dialog box.
- Then, type “diskmgmt.msc” in that dialog box and hit the OK button to launch the window.
- If an SSD is not initialized, then you won’t able to see it. Otherwise, you can see the disk name over here. Choose the initial disk (named Disk1 By default) and right-click on it.
- After that, click on either MBR option or on the GPT option as per your device Motherboard. In the case of Windows 10, you might choose the GPT and choose the MBR in the case of the other version of Windows 10.
- Next, click the OK button and apply the new setup and perform the new SSD initialization process.
- After finishing the initialization process, then you will find a new volume with Disk Management process.
- Now, choose the Partition Style for that selected disk and choose the GPT option again to confirm the partition style.
- Right-click on the New Simple Volume and click on the Next button from the appeared window.
- Next, choose a driver letter different from other drivers and tap the Next button to go the next step. Then, you might format that drives with the NTFS file system.
- Finally, hit the Finish button and complete the SSD setup process. Now, it becomes usable at this time.
Assign a New Drive Letter
- Type “devicemnmt.msc” in the Cortana’s search box and open the Disk Management window by hitting the Enter key from the keyboard.
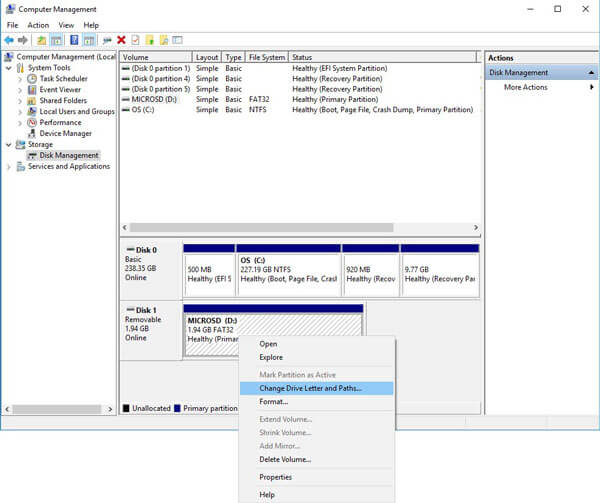
- Right-click on the disk which is selected for your SSD and choose the Change Drive Letter and Paths option from the drop-down list appeared on the screen.
- After that, click on the Change button to modify the disk partition.
- Now, select the drive letter under the Assign the following drive letter section. Remember, choose a letter which is totally new and not used before.
- Click the Change Driver Letter from the left pane of the window and choose the One Drive Letter from the sub-menu.
- After that, tap the Apply button and finish the driver assign process.
- Click the OK button and complete the disk partition process. Now, you can see the new drive letter for your drive and check whether it is enlisted in the assigned letters lists. It is one of the ideal processes to fix the SSD not showing up as a major problem.
Unhide Disk Partition
- Open the Disk Management window first and choose the drive where you want to unhide partition.
- Right-click on that target drive from the list of items. Otherwise, you can choose the Unhide Partition Feature from the Partition Management menu.
- Next, assign a drive letter for that particular partition and hit the Apply button. It helps to activate the new changes.
- When done, close the Disk Partition Management window and reboot the system to check whether the problem is fixed or not.
Create a Disk Partition Recovery
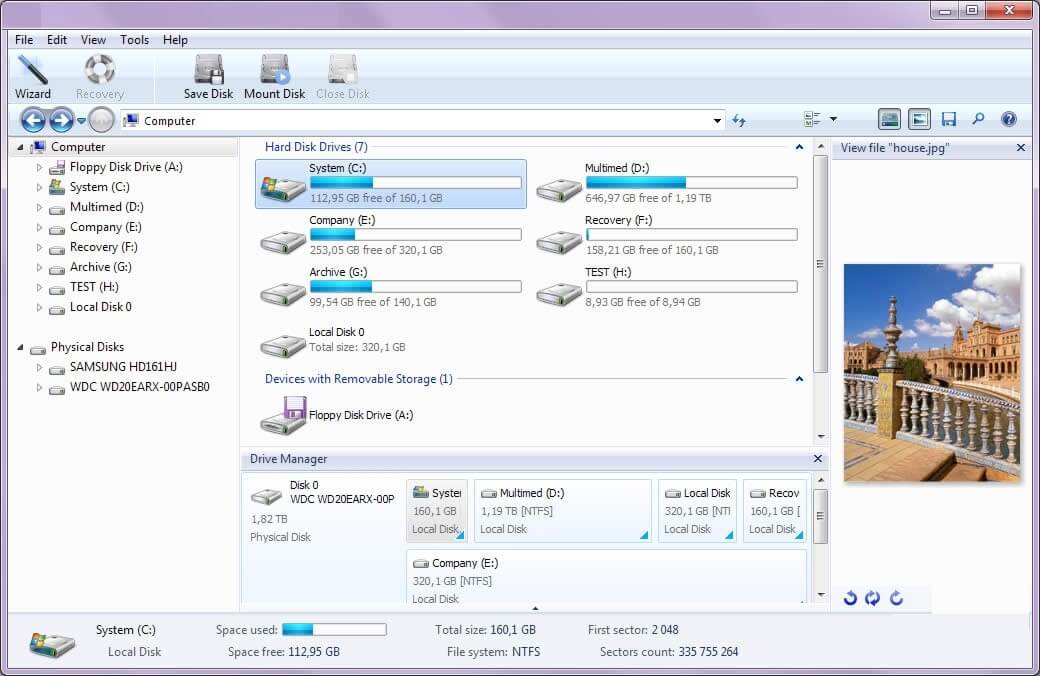
- Install a partition wizard and launch the tool on the screen. Here, you can see multiple features in the main interface of the Disk Partition wizard window.
- Now, choose the target SSD and right-click on the Partition Recovery option.
- Tap on the Check Disk menu and click on the Partition Recovery from the drop-down menu.
- Then, select the correct scanning range for performing the SSD partition recovery program. Choose the Full Disk among three modes that help to scan the entire SSD system.
- Now, click the Next button and continue with the process.
- After that, choose the scanning methods from the next screen. Select Full Scan to scan each sector properly that you have specified previously. However, you can choose the Quick Scan from the next time but for the first time scan, the Full Scan is the best way to proceed.
- After completing the SSD scanning, the lost or deleted partitions you can see as a listed format. However, choose any of the Partition on SSD and review all the files by double-tapping on the partitions.
- You can see the folder layout in the new window. Click the Finish button to close the Wizard window.
- At last, press the Apply button and perform the SSD partition recovery operation. Now, you can see the partitions on the SSD in the Windows File Explorer window. This will help to fix the SSD not showing up in File Explorer.
Use Another SATA Cable and Port
You can fix the SSD not showing up in File Explorer by repairing the port and replacing the cables used to connect the device. Moreover, you can verify it by using another SATA port. Furthermore, if you are using the PCIe SSD, then you need to test the hard drive with another Motherboard.
Re-Install the SSD Disk Driver
- Type “devicemgmt.msc” in the search box and hit the Enter key to open the Device Manager window.
- Now, go to the Universal Serial Bus Controller section and expand it to see the storage devices which are connected to the device.
- Right-click on the SSD and choose the Uninstall from the pop-up menu.
- Next, confirm it by tapping the YES button from the resultant screen.
- Now, re-install it and try to connect to verify the SSD not showing up Windows 10 got fixed or not.
Run a Malware Scan
- First, download strong security software from the authentic website and remember it might be in the latest version.
- Now, save the new folder on the desktop and double-tap on it to launch the folder on the desktop.
- Choose the installer file and double-click on it to run that executable file as soon as possible. Make sure that, your device has enough storage space to install the antivirus.
- The installation process will take a few minutes to complete the installation process and when done, hit the Finish button and close the installation window.
- Next, double-click on the antivirus icon and launch the antivirus security window on the screen.
- Click on the Scan tab or Scan for Virus option to run the antivirus.
- Then, select any of the scanning method (Quick Scan or Full Scan) from the next window. In the case of the Full Scan, it will start to scan the entire system including all the files and folders. However, the Quick Scan finds out the result quickly. In the case of the disk partition issue or system file corruption problem, the full scan is ideal to resolve the virus infection problem immediately.
- Now, you can see a list of virus-infected files along with the number of viruses found on your system.
- You can eliminate them by a single tap on the Disinfect button and the process will take several minutes to kill the malware, spyware, etc like major viruses.
- Once done, try to reboot the device and check whether the “SSD not showing up” issue is resolved or not.
Related Blog : WPX Hosting Black Friday
Upgrade Motherboard Storage Controllers and IDE ATA Drivers
- Open the Device Manager tab and expand the System Devices from the list of the installed hardware devices.
- Double-click on the Intel chipset device from the list and choose the Driver tab.
- Now, hit the Update Driver button and it will take a few minutes to complete the entire upgrade process.
- When done, expand the IDE ATA/ATAPI Controllers and you can see a list of IDE ATA drivers under it.
- Choose the driver which you want to update and right-click on it.
- Tap on the Driver tab from the Properties window and click on the Update Driver button from that window.
- Wait for a while until the successful driver update message appears on the screen. Once done, try to reboot and check whether the SSD error is shown on the screen or not.
Format the Hard Drive
- Open the Device Manager window and right-click on the new hard drive. Now, choose the Format option from the appeared pop-up menu.
- Now, type a descriptive drive name in the Value Label text box and choose the File System from the drop-down menu.
- Next, select the NTFS for the Windows 10 and use th Allocation unit size option from the drop-down list. Choose it as the Default option.
- Tick the Perform a quick format check box and click the OK button twice to close the window.
- Finally, check whether the warning message “SSD not showing up” pops-up anymore.
Note: This Partition Deletion operation cause loss of data like major issues. So, you might save all the data before starting this formatting program.
The Bottom Line
In the above article, we have defined the problem regarding the SSD not showing up like significant Windows issue. Moreover, we have discussed the possible reasons for this annoying issue. Not only that but also, we have described the steps to overcome the SSD error. So, we hope this content will be helpful to avoid SSD not showing up Windows 10 issue quickly and will enhance the system performance.